Uploading Hours into a Pay Cycle
How to upload hours into a Pay Cycle.
Notes
Before you can upload hours into a pay cycle, you must configure your hour benefit type codes in your company settings. See article How to Configure & Assign Hour Benefits.
OVERVIEW
If you have hourly employees and use Timesheets or third-party timekeeping software, chances are you'll need to upload hours into your pay cycle. This article explains the steps you must take to successfully import hours into pay cycles to pay out hourly employees.
Namely Time clients can sync hours seamlessly into Payroll without configuring or importing any CSV files. To learn more, visit ourSyncing Hours From Namely Time to Payroll guide.
CONFIGURING YOUR IMPORT FILE
If you are using an outside time-keeping solution, you will need to configure your import file.
Note: Import files must be in .CSV format.
Third-Party Timekeeping Clients
To configure your import file:
-
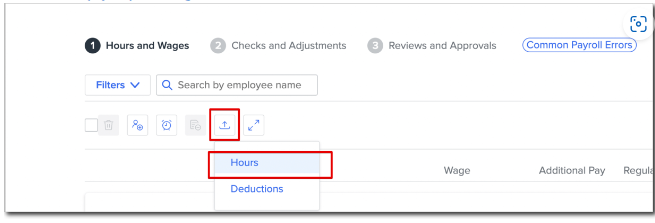
In Step 1 of payroll processing click the upload icon on the toolbar then select Hours.


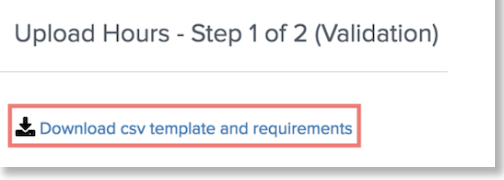
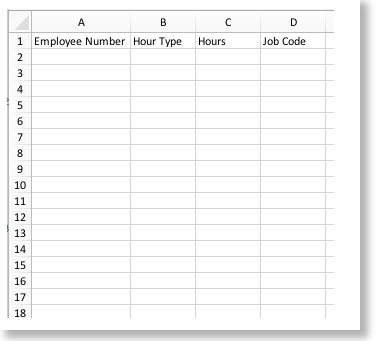
Use the .CSV template for your import file and make sure it complies with the requirements described in the Upload Requirements PDF:
-
Remove any blank or incomplete rows after the last record.
-
In Column A, enter a unique identifier for your employees. Make sure your column header is titled correctly for the unique identifier you choose. You can choose one of three options:
-
GUID: This is a unique identifier created by Namely when an employee's profile is created. You can pull GUIDs from HRIS by running a Profile Report from Namely’s reporting engine.
-
Employee Number: This field is populated in HRIS and syncs to Payroll. The field is not auto-generated. If you want to use this unique identifier, you need to update the field in HR and in your timekeeping solution.
-
Employee ID: This is the Namely-generated payroll ID for your employees found at the top of their payroll profiles.
-
In Column B, enter the external Hour Type of your hour benefit.
-
In Column C, enter the Hours of each type the employee worked.
-
In Column D, enter the Job Code for multiple wages (optional). This should match the External Job Code in your Company job code set up.
-
If you do not use job codes, delete this column before uploading your file.
-
Make sure all of your column headers are titled exactly as they appear in the .CSV template. Any misspellings will result in an import error.
-
Save your file as a .CSV file.

UPLOADING HOURS INTO PAYROLL
To upload hours into payroll:
-
In Step 1 of payroll processing click the upload icon on the toolbar then select Hours.

-
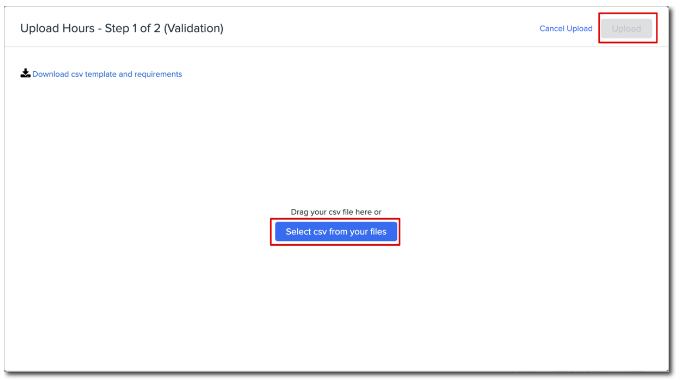
Click Select csv from your files or drag and drop the file into the validation window.
-
If your file contains any errors, they will display in the validation window. You can't finish your upload until the errors have been corrected.
-
Click Upload.

If you need to reimport your file, you will need to reset your payroll run by clicking Reset next to the payroll cycle in the Payroll Center.